Jupyter Tips & Tricks
Converting a jupyter notebook to pdf
jupyter nbconvert my_notebook.ipynb --to pdf
If you want to change the font size, for instance, you can do it through overriding templates (docs,base templates), but it can get complex. So the easiest way is to convert to LaTeX first, do some simple replacements, and then convert the resulting LaTeX to pdf via the pdflatex utility:
    $ jupyter nbconvert --to latex my_notebook.ipynb
    $ sed -r -i 's/documentclass\[11pt\]\{article\}/documentclass[8pt]{extarticle}/' my_notebook.tex                                                       # <---- This modifies the font size from 11pt to 8pt
    $ sed -r -i 's/geometry\{verbose,tmargin=1in,bmargin=1in,lmargin=1in,rmargin=1in}/geometry{verbose,tmargin=0.5in,bmargin=0.5in,lmargin=0.2in,rmargin=0.2in}/' my_notebook.tex # <---- This sets the margins
    $ pdflatex my_notebook
    $ rm my_notebook.tex; rm my_notebook.out; rm my_notebook.aux; rm my_notebook.log
- Requirements:
- texlive-xetex must be installed in the system (Ubuntu installation: apt-get install texlive-xetex texlive-generic-extra)
- Refs:
Creating a jupyter notebook programatically
import nbformat as nbf

nb = nbf.v4.new_notebook()

# Text Cell ---------------------------------
text = """\
# My first automatic Jupyter Notebook
This is an auto-generated notebook."""

# Code Cell ---------------------------------
code = """\
%pylab inline
hist(normal(size=2000), bins=50);"""

# Create & Save the Notebook ----------------
nb['cells'] = [nbf.v4.new_markdown_cell(text), nbf.v4.new_code_cell(code) ]
nbf.write(nb, 'test.ipynb')

# You can run this notebook from the command line (if you want):
jupyter nbconvert --execute --inplace test.ipynb
Sharing the same execution environment (Kernel) between multiple Jupyter notebooks
You may have been in a situation where you want to have multiple notebooks to run in the same environment, so they share the variables, Series, DataFrames, etc. between them (e.g. when your notebooks become very long and you want to split the content between several of them).
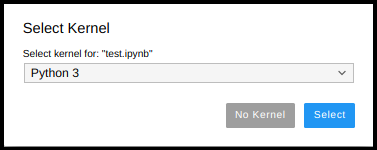
What you need to know is that each jupyter notebook you run, by default, creates a running space of its own in the memory (its Kernel). You select the Kernel for your notebook when you open your notebook; this is the “funny” window that pop-ups when you open the notebook:
If you click on that menu, you will see that the rest of the notebooks that you are running will appear there:
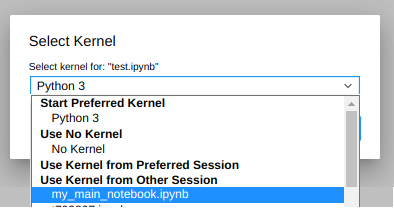
So just select the kernel you want to use from the list (in this case my_main_notebook,ipynb) and… voilá! Both your newly opened notebook and the selected one will be using the same Kernel.
Running a Jupyter notebook from the command line
If you need to execute a notebook from the command line (e.g. if you are automating the execution of multiple notebooks or generating a pdf of the output), just run:
jupyter nbconvert --to notebook --execute test.ipynb
Saving/Restoring a Jupyter Notebook Session
Say you have been working a lot in your current notebook, you have lots of DataFrames and Series that get a long time to be computed, and you want to make sure you recover quickly if, for some reason, your Session (Kernel) dies.
The answer is “dill”.
Installation:
pip install dill
Save a Notebook session:
    import dill
    dill.dump_session('notebook_env.db')
Restore a Notebook session:
    import dill
    dill.load_session('notebook_env.db')
Caveats:
- Fails when there are generators.
- If you have pyodbc connection objects hanging around, you'll need to close them and then set them all to None otherwise, you get a “TypeError: can't pickle pyodbc.Connection objects” error.
- The notebook state does not include graphs that were generated by your code, so you'll need to rerun the cells to bring these back.
Refs:
Sharing Variables Between Jupyter Notebooks
Often times you will be working in different notebooks (with different kernels) and you will want to share a variable from one notebook to the other.
In order to share a variable (e.g. string, dict, Series, DataFrame, etc.) just use the %store magic:
On the “sending” side:
%store mydf
On the “receiving” side:
%store -r mydf
That's it!
Read more about the %store magic here:
Connecting with ipython from the command line to a running Jupyter session
Summary
Just follow these 2 steps:
1. Identify your running kernel by running the “%connect_info” magic in Jupyter:
In [1]:  %connect_info
         [...]
               $> jupyter <app> --existing kernel-ff88459b-1b81-4f30-9ae6-e7ccbe9ab902.json
         [...]
2. Connect to the kernel from ipython:
$ ipython console --existing /home/ds4n6/.local/share/jupyter/runtime/kernel-ff88459b-1b81-4f30-9ae6-e7ccbe9ab902.json
Details
As you may know, the original version of Jupyter was called ipython. At some point Jupyter migrated from the command line (ipython) to a web-based interface (Jupyter Notebook) and then to a more sophisticated environment (JupyterLab).
ipython, for those familiar with Jupyterlab, would be the command line version of a Console.
Well, in any case, the core of all these tools is always the same: the Kernel. The Kernel is running on the server in the background and it's where your session really lives. That's why your session does not die even if you close your browser. You can always connect to it from the Jupyter web-interface or from the command line with ipython as long as it's running.
There are multiple reasons why you may still want to use ipython: you may be more comfortable working in the command line, you are working remotely on a terminal with no possibility to map the Jupyter ports to your local system, etc.
In any case, the question is: how can I connect from ipython to an already running session? Remember that we discussed in a previous TIP how to share the same Kernel between multiple notebooks. Well, the idea here is the same, we want to share the Kernel with one (or multiple) ipython sessions. That was easy to do from the web interface, but, how to do it from the command line? Well, it's a little more convoluted, but not particularly difficult.
The first step would imply to figure out what your Kernel ID is for the Jupyter session you want to connect to. This is easily achieved in Jupyter through the “%connect_info” magic:
In [1]:  %connect_info
{
  "shell_port": 34877,
  "iopub_port": 44475,
  "stdin_port": 38909,
  "control_port": 38423,
  "hb_port": 35197,
  "ip": "127.0.0.1",
  "key": "c26e1ceb-38a33ac200504e99151caf4e",
  "transport": "tcp",
  "signature_scheme": "hmac-sha256",
  "kernel_name": ""
}

Paste the above JSON into a file, and connect with:
    $> jupyter <app> --existing <file>
or, if you are local, you can connect with just:
    $> jupyter <app> --existing kernel-ff88459b-1b81-4f30-9ae6-e7ccbe9ab902.json
or even just:
    $> jupyter <app> --existing
if this is the most recent Jupyter kernel you have started.
Note the line that reads:
jupyter <app> --existing kernel-ff88459b-1b81-4f30-9ae6-e7ccbe9ab902.json
That is the identifier of your running kernel.
Not only that, all running kernels have a json file describing their characteristics. You can find it under your home directory:
- /home/ds4n6/.local/share/jupyter/runtime
If you cat the contents of that file you will see basically the same output as the one provided by the %connect_info magic:
$ cat kernel-ff88459b-1b81-4f30-9ae6-e7ccbe9ab902.json
{
  "shell_port": 34877,
  "iopub_port": 44475,
  "stdin_port": 38909,
  "control_port": 38423,
  "hb_port": 35197,
  "ip": "127.0.0.1",
  "key": "c26e1ceb-38a33ac200504e99151caf4e",
  "transport": "tcp",
  "signature_scheme": "hmac-sha256",
  "kernel_name": ""
}
So, now the only thing you need to do is provide that file to ipython:
ipython console --existing /home/ds4n6/.local/share/jupyter/runtime/kernel-ff88459b-1b81-4f30-9ae6-e7ccbe9ab902.json
And voilá! You are now working on the session (dataframes, variables, series, etc.) as the Jupyter one. Note that this is the same session, so anything you do here will have exactly the same impact as if it was done in Jupyter.
One last tip. What if you don't have access to Jupyter and therefore you just can't run the %connect_info magic?
Well, just do an “ls -ltr” to list the files in a revers time order, and your session is probably one of the last files listed.
    $ ls -tlr /home/ds4n6/.local/share/jupyter/runtime/
    [...]
    -rw------T 1 ds4n6 ds4n6 263 Oct  8 05:27 kernel-1e7954e1-0b8f-4645-b488-834cd1fd0c42.json
    -rw------T 1 ds4n6 ds4n6 263 Oct  8 05:32 kernel-958a9e64-4375-47b6-a9db-832a3eece18a.json
    -rw------T 1 ds4n6 ds4n6 263 Oct  8 05:32 kernel-ff88459b-1b81-4f30-9ae6-e7ccbe9ab902.json  <------
A little try & err will get you to the one you want.
Hope you enjoyed this new tip!